
talpia-4
This article, completely original, is copyrighted by its author, me. Please do not reproduce it.
本文为原创作品,作者 Kolyn090 拥有其著作权,受法律保护。严禁复制、转载、仿冒或以任何形式使用。
Category: Tutorial
Prerequisite: Basic Python
Dear readers, it’s been two months since my last tutorial. Don’t worry, I’m still here!
Just to jog your memory (and mine), my goal to make a pixel art editor like “dotpict!”. Well, that was the plan. A bit back, I dove into adding some transparency to talpia, and today, I’m gonna show you what I dug up.
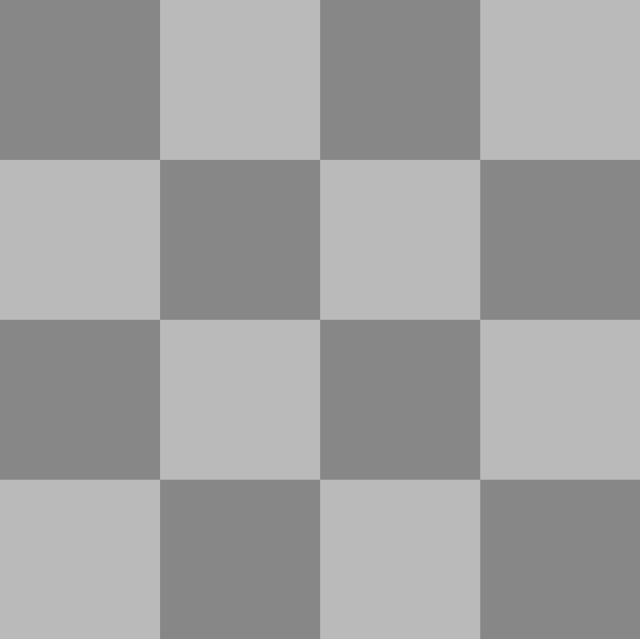
For starter, the plain white background needs to be changed to a transparent one. Like this
Looking familiar? I’ll show you how to generate this transparent background via program.
Firstly, notice that the background only has two kinds of colors: [135, 135, 135] (dark) and [186, 186, 186] (light), and they are arranged like a standard Chess board.
After we observe further, we can find that the dark blocks only appear in positions where both row and column are even or odd. The rest of them are light blocks.
Now, I’ll create a new file and name it transparent_bg.py. Inside it, write a function to create the background
import numpy as np
from PIL import Image

def create_bg(length, times2, gray1, gray2):
    bg = np.zeros([length, length, 3], dtype=np.uint8)

    for row in range(length):
        for col in range(length):
            if ((row % 2 == 0 and col % 2 == 0) or
                    (row % 2 == 1 and col % 2 == 1)):
                bg[row, col] = gray1
            else:
                bg[row, col] = gray2
    return bg
Here, create_bg()’s parameter length is the total number of dark and light blocks in an edge. The background is assumed to be a square. In addition, the transparent background example I showed to you previously has a length of 4.
The parameter times2, please don’t worry about it for now.
gray1 is the first color and gray2 is the second color.
Next, we can call this function:
transparent_bg = create_bg(4, 0, [135, 135, 135], [186, 186, 186])
print(transparent_bg)
The command line will display a numpy array.
To verify that we have the correct background, I will save the array as an image. Remember that save_arr_as_png() function we wrote earlier? Now it’s a good time to move it to its own file.
Create a new file, and name it save_img.py. Inside it, add
import numpy as np
from PIL import Image

def save_arr_as_png(arr, filename):
    modified_arr = np.rot90(arr, k=1)
    modified_arr = np.flip(modified_arr, axis=0)
    image = Image.fromarray(modified_arr)
    image.save(f"{filename}.png")
Go back to drawboard.py, replace the old save_arr_as_png() function with
from save_img import save_arr_as_png

def save():
    save_arr_as_png(arr, "talpia")

button3 = tk.Button(base,
                    text='save',
                    command=save)
Go back to transparent_bg.py, add
from save_img import save_arr_as_png

transparent_bg = create_bg(4, 0, [135, 135, 135], [186, 186, 186])
print(transparent_bg)
save_arr_as_png(transparent_bg, "bg")
Run transparent_bg.py, we get a 4 x 4 pixels “transparent background” called “bg.png”
That’s too small. I will resize it to 64 x 64 pixels. Now we’ll be using that times2 parameter which I introduced earlier.
def create_bg(length, times2, gray1, gray2):
    def resize_array(array):
        return array.repeat(2, axis=0).repeat(2, axis=1)

    bg = np.zeros([length, length, 3], dtype=np.uint8)

    for row in range(length):
        for col in range(length):
            if ((row % 2 == 0 and col % 2 == 0) or
                    (row % 2 == 1 and col % 2 == 1)):
                bg[row, col] = gray1
            else:
                bg[row, col] = gray2

    for _ in range(times2):
        bg = resize_array(bg)

    return bg
The resize_array() function essentially turns one pixel to two by two (four) pixels. Therefore, after we call it once, 4 x 4 pixels will be 8 x 8 pixels. And if we keep calling it 4 times, we’ll get 64 x 64 pixels. The parameter times2 decides the number of times resize_array() will be called.
transparent_bg = create_bg(4, 4, [135, 135, 135], [186, 186, 186])Now we end up with
That’s all for today. I haven’t figure out a good way to implement layers yet. But don’t worry! I’ll write another tutorial after I made some new progress.
Find the code on my GitHub page, under the part_4 directory.
If you liked this tutorial, consider giving a Star to this repository or a Like to the original post.
🍯 Happy Coding 🍯
This article, completely original, is copyrighted by its author, me. Please do not reproduce it.
本文为原创作品,作者 Kolyn090 拥有其著作权,受法律保护。严禁复制、转载、仿冒或以任何形式使用。