
Getting coins amount with Custom Template
This article, completely original, is copyrighted by its author, me. Please do not reproduce it.
本文为原创作品,作者 Kolyn090 拥有其著作权,受法律保护。严禁复制、转载、仿冒或以任何形式使用。
Category: Tutorial
Platform: Windows
Prerequisite: Basic Python, read this article
Recap
Last time we attempted the problem of reading coins amount using pytesseract. It works but it can take over a second to complete for one read during learning, which is slow. That is why today I will introduce to you another way that is way faster (and more accurate) - Template Matching.
Template Matching
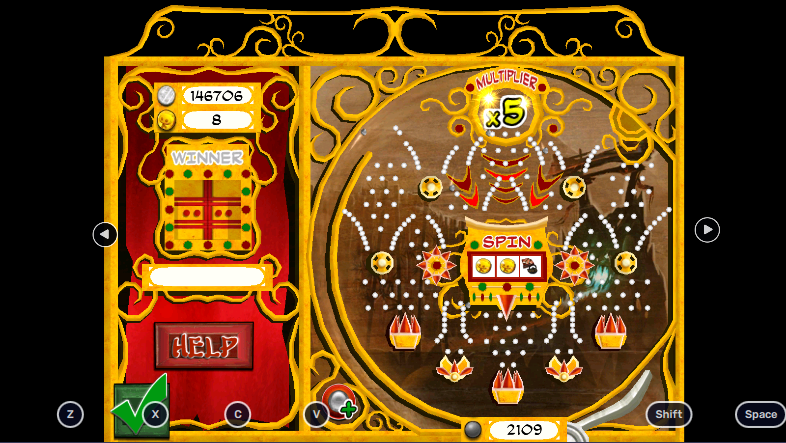
To perform template matching, you will need about the most (if not all) critical examples. Notice that here we know our digits always have the same typeface and the same font. In our case, assuming your emulator window size is always the same, they are:


Notice that this is not an exhaustive list. That is because in the game’s font, some digits will sometimes ‘stick’ to other digits. E.g.


Sometimes a digit can be read in different forms depending on their current positions. E.g.


It’s hard to see the difference but if you zoom in you will see it.
That’s still far from exhaustive. You might even see 3 or more digits stick together. I hope by now you can realize that sometimes it’s very hard to collect all templates. That’s why we will have to handle them respectively.
You can use a pixel art editor to get those examples, but I will show you how to do this with Python. Before that, you will have to understand how to get the digits separated.
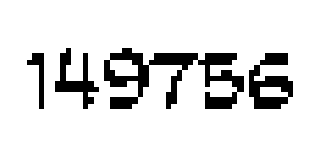
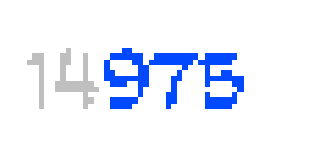
Consider this example

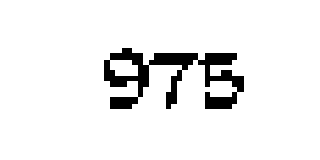
Its binarization is
🤓 Binarization simply means to convert an image to strictly black and white (there is no gray).
In a grayscale image, each pixel can be represented as an integer ranged from [0, 255]. With 0 being completely black and 255 being completely white. Everything in between is gray. Therefore, a grayscale image is equivalent to a matrix of integers. When binarize, typically, you will paint a pixel value under certain threshold black. Here, I chose 127 because 255 // 2 = 127.
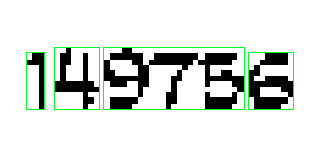
Now we make a wish - somehow we can crop out the digits this way.
Now we try to make our wish come true. Let’s not think about the image as a string of integers for a moment, but a bunch of black blobs. Each black pixel should find a blob it belongs to. One single black pixel can form its own blob, and many black pixels near each other can form a larger blob.
In this image we have 4 blobs.
Now imagine applying Depth First Search on one of the black pixels to search for blobs. Say, a random pixel in the first blob. You will get

Now we mark the pixel in the first blob as ‘visited’ and pick from other pixels in blobs. For example, the second blob.

Mark the second blob as ‘visited’, and continue


In the end, DFS has read:


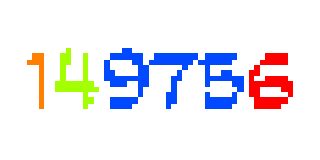
We know that our images consist only black or white pixels. Now we discard all the unnecessary white pixels.


🎉 There, dear readers. I represent you the 4 blobs.
It’s great we have the blobs. However, in template matching, we prefer the reference and the compared to have the same size. We can easily achieve this with cv2 library, but the core idea is to create a background and put the blob in the center. For example

📍 I painted the border green just to distinguish it from the website background.
Here, we can use this image as one of the templates for recognizing digit 6. Next time we see another 6, we can compare it with the template.
 compared to gets score 76.19047619047619
 compared to gets score 11.129660545353367
I will discuss how to get the scores later.
Great. These should be all about template matching. Remember, it has more applications than just recognizing digits. You will see in other posts how I use it in other games such as Egg Inc. and Plants vs Zombies for other things.
Now, we program
Step 1
I assume you came with the knowledge of my previous post, so I will continue to use the same project hierarchy. First, create a new folder digit_recognizer under pachinko. Inside digit_recognizer, create a new folder digits and a new script digit_recognizer.py. In digit_recognizer.py, put
import os
import cv2
import numpy as np

script_dir = os.path.dirname(os.path.abspath(__file__))
🤓 script_dir is the absolute path to this script file. Later we will be concatenating this with the template images’ paths in order to find the templates across the entire project.
Next we create the class.
class Digit_Recognizer:
    def __init__(self):
        def load_binary(path):
            img = cv2.imread(path, cv2.IMREAD_GRAYSCALE)
            _, binary_img = cv2.threshold(img, 127, 255, cv2.THRESH_BINARY)
            return binary_img

        self.digit_template = {
            '0': load_binary(os.path.join(script_dir, 'digits/0.png')),
            '1': load_binary(os.path.join(script_dir, 'digits/1.png')),
            '2': load_binary(os.path.join(script_dir, 'digits/2.png')),
            '3': load_binary(os.path.join(script_dir, 'digits/3.png')),
            '4': load_binary(os.path.join(script_dir, 'digits/4.png')),
            '5': load_binary(os.path.join(script_dir, 'digits/5.png')),
            '6': load_binary(os.path.join(script_dir, 'digits/6.png')),
            '7': load_binary(os.path.join(script_dir, 'digits/7.png')),
            '8': load_binary(os.path.join(script_dir, 'digits/8.png')),
            '9': load_binary(os.path.join(script_dir, 'digits/9.png'))
        }
🤓 load_binary loads the image in given path and convert to binary. It first converts the image to grayscale, then apply threshold on it. Every pixel value greater than the threshold (127) will be set to the maxval (255) and everything less will be set to 0. self._digit_template is a dictionary that stores all digits along with its template. This dictionary is not final, later we will be adding more things to it.
Digit_Recognizer must be able to recognize, let’s create this function.
def recognize(self, compared):
    def mse(array1, array2):
        r = np.mean((array1 - array2) ** 2)
        return r if r != 0 else 0.001

    similarities = []
    for key, value in self._digit_template.items():
        similarities.append(1 / mse(compared, value))

    result = 0
    highest = 0
    for i in range(len(similarities)):
        if similarities[i] > highest:
            highest = similarities[i]
            result = i

    return list(self._digit_template.keys())[result]
🤓 Inside recognize, there is an inner function mse. This stands for Mean Square Error. It essentially compares to numpy arrays and returns a value. Smaller the value, more similar the two images are. It will return 0 if the two images are identical.
We will apply mse to the compared with all templates from 0 - 9. For similarity, we choose 1 / mse, in this way it’s more clear. That’s why I want to return a small value like 0.001 instead of 0 to prevent zero divisions. We get a list of similarities and the next thing is to find the biggest one among them and its associated key will be the digit we are looking for.
We can test this. Drag and download the following images to digits.
if __name__ == '__main__':
    def load_binary(path):
        img = cv2.imread(path, cv2.IMREAD_GRAYSCALE)
        _, binary_img = cv2.threshold(img, 127, 255, cv2.THRESH_BINARY)
        return binary_img

    digit_recognizer = Digit_Recognizer()
    comparing = load_binary('digits/0.png')
    print(digit_recognizer.recognize(comparing))
outputs
0Print the similarities list, we get
[1000.0, np.float64(10.867924528301886), np.float64(16.0), np.float64(16.45714285714286), np.float64(9.931034482758621), np.float64(13.09090909090909), np.float64(12.0), np.float64(14.048780487804878), np.float64(11.294117647058822), np.float64(14.399999999999999)]The first key, 0, is indeed the most similar to itself.
Step 2
Recall that last time we built Coins_Pytesseract class, which uses the pytesseract library to recognize digits. This time we will build another class with the same functionality. Create coins_tm.py under pachinko, put
import os
import cv2
import numpy as np
from src.util.screen_getter import get_window_with_title, get_screenshot_of_chosen_window
from src.pachinko.location.ui_position import coin_bound
from src.pachinko.digit_recognizer.digit_recognizer import Digit_Recognizer

class Coins_TM:
    def __init__(self, window):
        self._window = window
        self._digit_recognizer = Digit_Recognizer()
        self._debug = False
None of these are new and I have just explained digit_recognizer.
Now add extract_coin_amount function.
def extract_coin_amount(self):This function is going to be very long and contains a huge amount of information so I will break it down into pieces.
First of all, like before. We want the screenshot of coins amount.
screen = get_screenshot_of_chosen_window(self._window)
coin_region = screen.crop(coin_bound)
Now things starts to become different. We convert the screenshot to cv2.
# convert region from pil to cv2
coin_region = pil_to_cv2(coin_region)
self._debug_save('region.png', coin_region)
🤓 pil_to_cv2 converts the given PIL image to a cv2 image. _debug_save saves the given cv2 image to the path if self._debug is True.
Here is pil_to_cv2, put this in extract_coin_amount.
def pil_to_cv2(pil_image):
    # ensure it's in RGB mode
    pil_image = pil_image.convert('RGB')

    # convert PIL to NumPy array (RGB)
    rgb_array = np.array(pil_image)

    # convert RGB to BGR
    bgr_image = cv2.cvtColor(rgb_array, cv2.COLOR_RGB2BGR)
    return bgr_image
_debug.save along with the rest of the debugging functions, put these in Coins_TM
def _debug_save(self, path, cv2_img):
    if self._debug:
        cv2.imwrite(path, cv2_img)

def _debug_print(self, message):
    if self._debug:
        print(message)

def set_verbose(self):
    self._debug = True
Now we continue from extract_coin_amount. Like we discussed before, we want to binarize the screenshot so that it becomes something like:
# make region to binary
coin_region = make_binary(coin_region, threshold=127)
self._debug_save('region_binary.png', coin_region)

def make_binary(cv2_img, threshold=127):
    # convert to grayscale
    grayscale = cv2.cvtColor(cv2_img, cv2.COLOR_BGR2GRAY)

    # apply binary threshold
    _, binary = cv2.threshold(grayscale, threshold, 255, cv2.THRESH_BINARY)

    return binary
🤓 make_binary converts the given cv2 image to binary, same idea as load_binary but this time we don’t have to load the image.
Next we will be finding the blobs. I have decided to find them with their bounding boxes. You’ll see why that could be beneficial.
Write a new method in Coins_TM.
def _find_blobs_with_bounding_box(self, binary_img):
result = []
# visited array to track processed pixels
visited = np.zeros_like(binary_img, dtype=np.uint8)
# iterate through each pixel in the binary image
h, w = binary_img.shape
for y in range(h):
for x in range(w):
if binary_img[y, x] == 0 and visited[y, x] == 0:
# extract the blob using DFS and get its bounding box
blob_mask, min_x, max_x, min_y, max_y = self._dfs(x, y, binary_img, visited)
# append the blob mask and bounding box to the list
result.append((blob_mask, min_x, max_x, min_y, max_y))
# sort blobs by their x-coordinate (left-to-right order)
result.sort(key=lambda b: b[1]) # sort by min_x
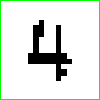
return result🤓 First, it creates a list to store our result. Second, visited, an image (matrix) of all zeros, same as the size of our screenshot, is created. visited is currently a all-black image if you save it. Third, we apply DFS to find all blobs along with their bounding boxes. After we have the blobs, we order them by the x-coordinate, which means that they are ordered from left to right. ['1', '4', '975', '6']
Now create the _dfs method in Coins_TM.
@staticmethod
def _dfs(x, y, binary_img, visited):
    assert binary_img[y, x] == 0, "starting position is not black"

    directions = [(-1, -1), (-1, 0), (-1, 1),
                  (0, -1), (0, 1),
                  (1, -1), (1, 0), (1, 1)]

    h, w = binary_img.shape
    stack = [(x, y)]
    min_x, max_x, min_y, max_y = x, x, y, y  # track bounding box

    # create a white background to store the blob
    blob_mask = np.full_like(binary_img, 255, dtype=np.uint8)

    while stack:
        cx, cy = stack.pop()
        if 0 <= cx < w and 0 <= cy < h and binary_img[cy, cx] == 0 and visited[cy, cx] == 0:
            # mark the pixel as visited
            visited[cy, cx] = 1
            # paint position (cx, cy) in blob_mask
            blob_mask[cy, cx] = 0

            # update bounding box
            min_x, max_x = min(min_x, cx), max(max_x, cx)
            min_y, max_y = min(min_y, cy), max(max_y, cy)

            # push all nearby 8 neighbors
            for dx, dy in directions:
                nx = cx + dx
                ny = cy + dy
                stack.append((nx, ny))

    return blob_mask, min_x, max_x, min_y, max_y
🤓 This is a stack-based DFS and each call to _dfs finds one blob. We assume that the (x, y) position given in the parameter is a black pixel in our image. After that, we create a directions 2D array to store all possible directions. This stands for the 8 nearby neighbors around the pixel. We store h and w for image size reference, then create the stack and put the first position inside and initialize the 4 points of bounding box for this blob. Before we start DFS, we create a white background blob_mask to store the blob.
After all the preparations, we can finally start DFS. Like a normal DFS, we pop the most recent item out and call it cx and cy. We make sure that (cx, cy) is a valid position in the image and the pixel is indeed black in (cx, cy) and it has not been visited. By the way, it's written `[cy, cx]` because Numpy arrays are row-first indexing. The first index is the row and it corresponds to y-coordinate. The seconds index is the column and it corresponds to x-coordinate. Now we are certain about visiting this pixel; mark it as visited and paint it to black in blob_mask. After that, we update the bounding box as we see fit. Finally, we explore the pixel’s 8 neighbors and repeat this process until a blob is formed. Return the blob_mask with the bounding box as our result.
After the first iteration of _dfs on our example, we do get
The rest of the iterations
We store them in a list and the next thing will be removing unnecessary white background from them. Let’s continue from extract_coin_amount
blobs_with_bounding_box = self._find_blobs_with_bounding_box(coin_region)
blobs = []
for blob_with_bounding_box in blobs_with_bounding_box:
    blob = self._remove_blob_background(blob_with_bounding_box)
    blobs.append(blob)
Here is the missing method
@staticmethod
def _remove_blob_background(blob_with_bounding_box):
    blob_mask = blob_with_bounding_box[0]
    min_x = blob_with_bounding_box[1]
    max_x = blob_with_bounding_box[2] + 1
    min_y = blob_with_bounding_box[3]
    max_y = blob_with_bounding_box[4] + 1
    return blob_mask[min_y:max_y, min_x:max_x]
Since we already know the bounding box of the blob, we just have to crop it out. ✌
The next we want to do is to make the blobs to have the same size. To do so, we add a fix sized canvas as background to each blob.
canvased_blobs = [self._edit_blob_canvas(blob, 24, 24) for blob in blobs]🤓 _edit_blob_canvas takes in the blob (image) and width and height. It creates a white background (canvas) for the blob. You can change the size to other values, especially when your original screenshot is large.
Here is the method
@staticmethod
def _edit_blob_canvas(blob, new_x, new_y):
    h, w = blob.shape

    # calculate padding on each side
    top = (new_x - h) // 2
    bottom = new_x - h - top
    left = (new_y - w) // 2
    right = new_y - w - left

    # check if the blob is grayscale (2D) or color (3D)
    # value will be white
    if len(blob.shape) == 2:  # grayscale image
        value = 255  # single integer for grayscale
    else:  # color image
        value = (255, 255, 255)  # tuple for color

    try:
        padded_image = cv2.copyMakeBorder(
            blob,
            top, bottom, left, right,
            borderType=cv2.BORDER_CONSTANT,
            value=value
        )
    except Exception as e:
        print(f"The blob is too large: {e}")
        print("Resolving...")
        new_x = h + 8
        new_y = w + 8
        top = (new_x - h) // 2
        bottom = new_x - h - top
        left = (new_y - w) // 2
        right = new_y - w - left

        padded_image = cv2.copyMakeBorder(
            blob,
            top, bottom, left, right,
            borderType=cv2.BORDER_CONSTANT,
            value=value
        )
        return False, padded_image

    return True, padded_image
🤓 cv2.copyMakeBorder extends an image by sides and fill the space with value (color).
📍 This function returns two things. The first is a boolean flag indicating whether the operation is successful. It will be true if the original blob is smaller than our specified size, otherwise false. The second is the new image (blob with canvas). It will return a new image regardless, and the only matter is how the canvas are created.
The idea here is to use cv2.copyMakeBorder to add a white border around the given image. In the end we will get back a new_x * new_y (in my case, 24 * 24) size blob image. We can save the new image as a template or use it for recognition.
This works except when the original blob is larger than our specified size. For example
has width larger than our specified width (24). To solve this, I decided to add a thickness of 4 border around the original blob.
Continue from extract_coin_amount, add
count = 0
os.makedirs('debug_digit', exist_ok=True)
for canvased_blob in canvased_blobs:
    if canvased_blob[0]:
        self._debug_save(f'debug_digit/{count}.png', canvased_blob[1])
        count += 1
Now create the following main function
if __name__ == '__main__':
    chosen_window = get_window_with_title('BlueStacks App Player')

    coins_tm = Coins_TM(chosen_window)
    coins_tm.set_verbose()
    coins_tm.extract_coin_amount()
Now let’s update your template. Open the emulator and the pachinko game. Remember to rescale the window using window_rescaler.py. Run the above main function. You will find a new folder debug_digit. Inside the folder, you should see blob images with canvas if everything goes correctly. Find images that can be use as templates, such as:
Replace your new images with the old templates in digits and change their names as you see fit.
🎉 Now you have your own templates.
We can try to create our final result now. In extract_coin_amount
result = ''
for canvased_blob in canvased_blobs:
    if canvased_blob[0]:
        extracted_text = self._digit_recognizer.recognize(canvased_blob[1])
    else:
        # Need to handle large blobs
    result += extracted_text
    self._debug_print(extracted_text)
return int(result)
Looks like we still have some problems needs to take care. That comment # Need to handle large blobs is actually a big task if you want to seriously handle it. Fortunately, this is a rare case, so using pytesseract would not cause big problems.
Now add these to the top of the script.
import pytesseract
pytesseract.pytesseract.tesseract_cmd = 'C:\Program Files\Tesseract-OCR\\tesseract.exe'
Replace # Need to handle large blobs with
extracted_text = pytesseract.image_to_string(canvased_blob[1], config='--psm 6')
match = re.search(r'\d+', extracted_text)
if match:
    extracted_text = match.group()
else:
    # The case where pytesseract doesn't work
Apparently we have a new problem. There is a possibility that there is no match from pytesseract. In this case, let me introduce to you a quick-and-dirty fix.
First, add this line in the constructor
self._last_result = 0Next, in extract_coin_amount, replace
return int(result)with
self._last_result = int(result)
return self._last_result
Lastly, replace # The case where pytesseract doesn't work with
return self._last_resultIn the end, you should have
result = ''
for canvased_blob in canvased_blobs:
    if canvased_blob[0]:
        extracted_text = self._digit_recognizer.recognize(canvased_blob[1])
    else:
        extracted_text = pytesseract.image_to_string(canvased_blob[1], config='--psm 6')
        match = re.search(r'\d+', extracted_text)
        if match:
            extracted_text = match.group()
        else:
            return self._last_result
    result += extracted_text
    self._debug_print(extracted_text)

self._last_result = int(result)
return self._last_result
I choose to simply return the last value gotten from extract_coin_amount and there we have completed this function.
Step 3
This is an optional step that teaches you how to add more templates to self._digit_template in Digit_Recognizer. As we have discussed already in the beginning of Template Matching, we can have templates such as
or even alternations of the same template
This step is a lot easier compared to the last one. Save the above images to digits. In Digit_Recognizer, change self._digit_template
self.digit_template = {
    '0': load_binary(os.path.join(script_dir, 'digits/0.png')),
    '1': load_binary(os.path.join(script_dir, 'digits/1.png')),
    '2': load_binary(os.path.join(script_dir, 'digits/2.png')),
    '3': load_binary(os.path.join(script_dir, 'digits/3.png')),
    '4': load_binary(os.path.join(script_dir, 'digits/4.png')),
    '5': load_binary(os.path.join(script_dir, 'digits/5.png')),
    '6': load_binary(os.path.join(script_dir, 'digits/6.png')),
    '7': load_binary(os.path.join(script_dir, 'digits/7.png')),
    '07': load_binary(os.path.join(script_dir, 'digits/07.png')),
    '77': load_binary(os.path.join(script_dir, 'digits/77.png')),
    '8': load_binary(os.path.join(script_dir, 'digits/8.png')),
    '8_2': load_binary(os.path.join(script_dir, 'digits/8_2.png')),
    '9': load_binary(os.path.join(script_dir, 'digits/9.png')),
    '9_2': load_binary(os.path.join(script_dir, 'digits/9_2.png'))
}
Change the last line in recognize
return list(self.digit_template.keys())[result].split('_')[0]🤓 Now if you want to add more alternations for a template, add an underscore and a new index after it.
FYI, the running time comparison:
Pytesseract: 1.1860626459121704
Template Matching: 0.21195433139801026
🎉 Excellent, now you understand how to do template matching. If you think this article is useful, please do give this repo a Star!
🍯 Happy Coding 🍯
This article, completely original, is copyrighted by its author, me. Please do not reproduce it.
本文为原创作品,作者 Kolyn090 拥有其著作权,受法律保护。严禁复制、转载、仿冒或以任何形式使用。