
SvZ Pachinko and Slot Machine
This article, completely original, is copyrighted by its author, me. Please do not reproduce it.
本文为原创作品,作者 Kolyn090 拥有其著作权,受法律保护。严禁复制、转载、仿冒或以任何形式使用。
Category: Tutorial
Platform: Windows
Prerequisite: Basic Python
What is the Pachinko mini game?
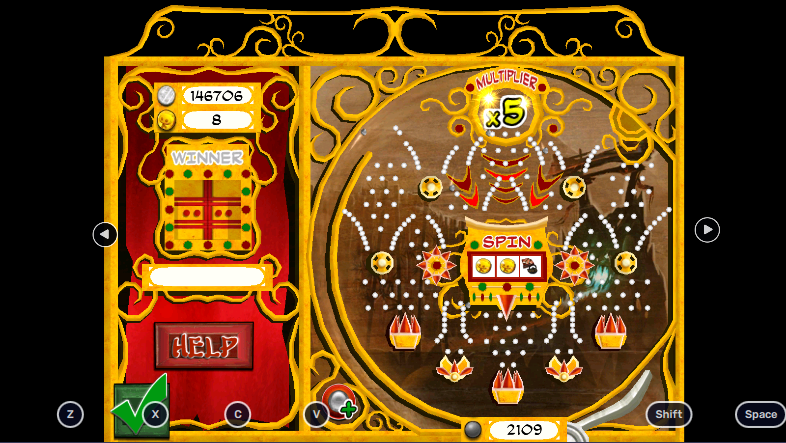
In Samurai vs Zombies, there is a mode called Pachinko where the players can gain extra game currency and items. The game consumes ‘balls’ and they can be obtained through battles or game rewards. To play the Pachinko machine, drag down the handle to shoot the ball.

If you aim correctly, the ball would land in one of the traps, or even better: the Slot machine.
-
Landing in a trap will give you coins, multiplied by the Multiplier. The Multiplier is equal to the number of balls in Pachinko, with the minimum being 1 and maximum being 5.
-
Landing in the Slot machine will spin it and there would be a chance to get 100 coins or items from it.
Traps
 This trap randomly gives base 5 / 10 coins for each ball landed in.
 This trap randomly gives base 25 coins for each ball landed in.
Problem Statement
Our goal is to maximize the number of coins and game items we can get. One observation we can make is that once the ball passes the Slot machine, it can only go to the middle trap and not others, so the best path seems to be:
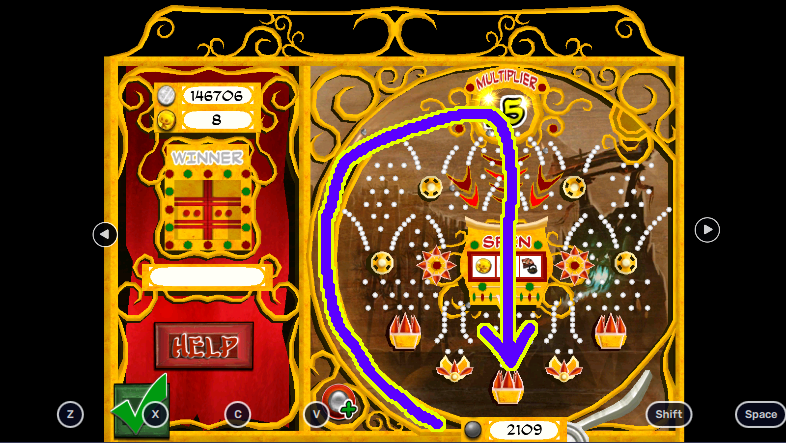
However, as mentioned earlier, the second type of trap gives out 25 coins consistently, which is significantly higher than the first type. Therefore, if you value coins more than game items, you should aim for the second type of trap.
Programmatic approach
Now I will be writing a Python program to play the Pachinko game for me.
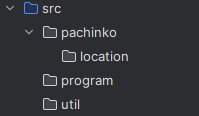
Step 1
Create a new Python project and create a folder hierarchy like so:
Step 2
📍 Note: step 2 is very long. If you don’t care about machine learning (only want to get the best result) in the pachinko game, you can almost certainly jump to step 3. However, be warned that you might encounter some problems with positioning if you don't read through step 2.
The first problem we want to solve is to actually reference the emulator window in Python. We will be analyzing screenshots since there is no access to the internal game data. In this tutorial I am assuming you are using BlueStacks emulator and you are playing the normal version game. You can find how to install here.
Create a new script screen_getter.py under util
import platform
if platform.platform().startswith('Win'):
    import pygetwindow as gw
import PIL.ImageGrab
Open the terminal and cd to the current project directory. Install the required packages.
pip install pygetwindow
pip install pillow
🤓 Pygetwindow is Windows specific so you will want to make sure the platform is Windows. We use it to get the window’s reference. Pillow is a powerful image library and later we will be using it for taking the screenshots.
Next, write a new function called get_window_with_title(). It will look for a window with a specific title. Here I am only going to write the most basic form to get the job done.
def get_window_with_title(title: str):
    def get_window_list_win():
        return gw.getAllWindows()

    def get_win_window():
        for window in get_window_list_win():
            if window.title.startswith(title):
                return window
        return None

    if platform.platform().startswith('Win'):
        return get_win_window()
    else:
        return None
Now let’s test this. Open BlueStacks emulator and run the following code:
if __name__ == '__main__':
    chosen_window = get_window_with_title('BlueStacks App Player')
    print(chosen_window)
If everything is correct, you should see something like:
<Win32Window left="-165", top="6", width="987", height="476", title="BlueStacks App Player 10">🎉 There we have a reference to the window now!
After we have the window, we want to take screenshots from it. Thanks to pillow, this step is not hard.
def get_screenshot_of_chosen_window(window):
    def run_win():
        x = window.left
        y = window.top
        h = window.height
        w = window.width
        return PIL.ImageGrab.grab(bbox=(x, y, w, h))

    if platform.platform().startswith('Win'):
        return run_win()
    else:
        return None
🤓 ImageGrab.grab crops out the screenshot of the entire PC Desktop with the provided bounding box. Here, our bounding box is exactly equal to the selected window, so we get its screenshot, a PIL Image object.
📍 The window must be active, otherwise the program won’t find it. There should not be any other window above it, otherwise the screenshoter will also take the overlay window.
Now let’s test.
if __name__ == '__main__':
    chosen_window = get_window_with_title('BlueStacks App Player')
    chosen_screen = get_screenshot_of_chosen_window(chosen_window)
    chosen_screen.save('screenshot.png')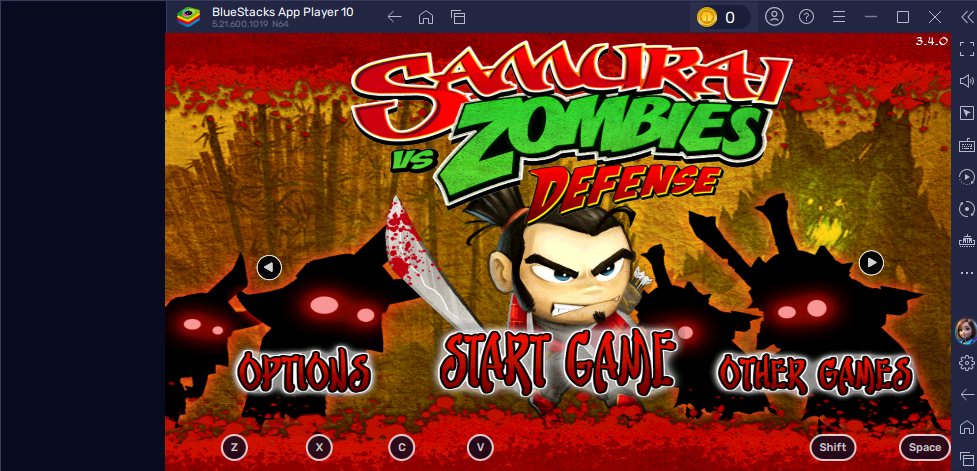
🤓 Image.save() saves the Image to the specified path.
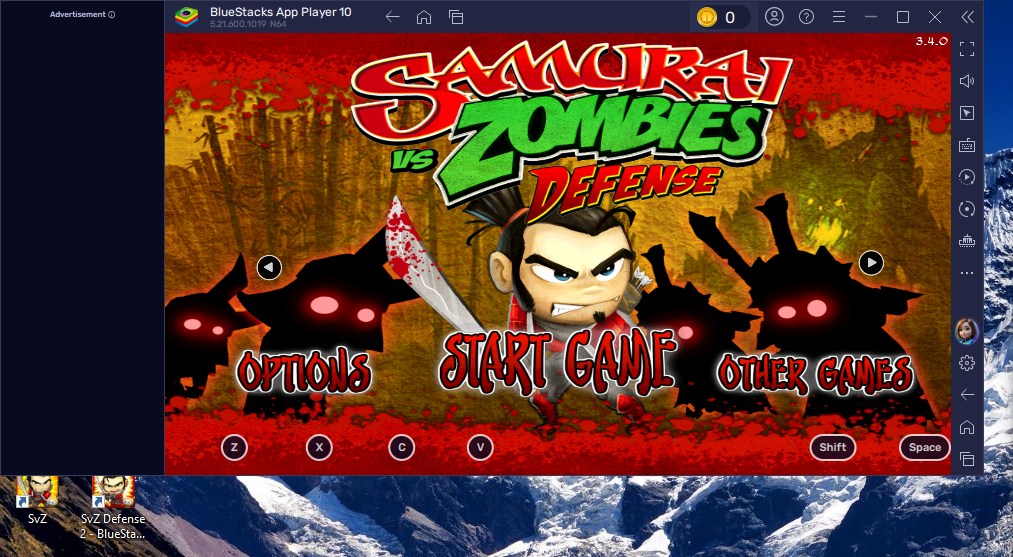
As you can see, there are some unnecessary regions in our screenshot. Also, the Ads are quite annoying! So our next step will be solving them.
You can ‘hide’ the ads by simplifying moving BlueStacks emulator to the corner of the Desktop!
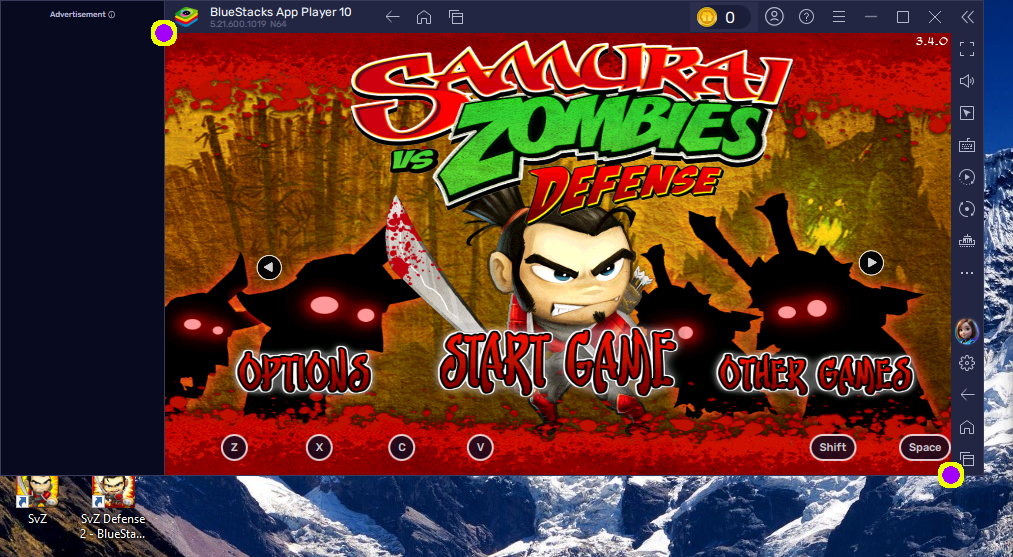
The next thing is that we only want the region within the marked boundary:
This is going to be a little hard but please bear with me. Now essentially we need to determine the bounding box of the marked region. To achieve this, I am going to write a program that can record mouse coordinates on the Desktop.
First, create program_obj.py and program_stopper.py under program directory.
In program_stopper.py
import keyboard
import threading
import os


# Observing key event to check for program termination.
class Program_Stopper:
    def __init__(self):
        self.running = True
        print("Press 'q' to stop the program.")

        # Start a new thread to observe for the 'q' key press
        self.observer_thread = threading.Thread(target=self.observe_stop_key)
        self.observer_thread.start()

    def observe_stop_key(self):
        # Loop until 'q' is pressed
        while self.running:
            if keyboard.is_pressed('q'):
                self.running = False
                print("Stopping the program...")
                os._exit(0)
                break

    def stop(self):
        # Call this method to stop manually if needed
        self.running = False
        if self.observer_thread.is_alive():
            self.observer_thread.join()  # Wait for the observer thread to finish
🤓 The only thing this class does is to terminate the program when the key ‘q’ is pressed. You might need to grant system permissions for this to work.
In program_obj.py
from src.program.program_stopper import Program_Stopper


# Contains references to program objects
class Program_Obj:
    def __init__(self):
        self.program_stopper = Program_Stopper()
🤓 The Program_Obj class instantiates a Program_Stopper and stopper listens to the ‘q’ key for termination, as mentioned earlier.
We will be using Program_Obj shortly. Now moving onto mouse coordinate.
Create mouse_coordinate.py under util, write
from pynput import *
from src.program.program_obj import Program_Obj
Install the package
pip install pynput🤓 We use pynput here to get the mouse information.
Now add
if __name__ == '__main__':
    def get_coords(x, y):
        print("Now at: {}".format((x, y)))

    Program_Obj()
    with mouse.Listener(on_move=get_coords) as listen:
        listen.join()
Here, we have instantiated Program_Obj and it’s ok that we can just leave it there. We will be able to terminate the program when ‘q’ is pressed.
🤓 mouse.Listener is a Thread. In this case, it listens to the mouse movement. Basically, it calls assigned on_move function when mouse moves. In this case, I want it to print x and y coordinates.
🎉 Now we got a program that can determine mouse coordinates. You should try this program before proceeding to the next step. Run the program and you should expect mouse coordinate printed. Remember, press ‘q’ key to stop.
Still remember our task? Determine the bounding box of the window.
I apologize but you will have to put the ads back, for now.
 Align the edge of the ads perfectly with the edge. Now comes the important part, run
 mouse_coordinate.py and record the positions of these two points (top-left and bottom-right):
I got:
(164, 32) and (950, 482)
🤓 This means that the first point is 164 pixels away from the left edge and 32 pixels away from the top edge of the Desktop. The second point is 950 pixels away from the left edge and 482 pixels away from the top edge of the Desktop. Awesome!
Now you can just go ahead and modify the main function in screen_getter.py to
if __name__ == '__main__':
    chosen_window = get_window_with_title('BlueStacks App Player')
    chosen_screen = get_screenshot_of_chosen_window(chosen_window)
    chosen_screen.save('screenshot.png')
    crop_bound = (164, 32, 950, 482)  # whatever values you got
    game_zone = chosen_screen.crop(crop_bound)
    game_zone.save('game_zone.png')
Run and you should get an almost perfect game zone screenshot (and you can hide the ads now. It will work with & without ads).
Now we can get the screenshot, but we still need to find a way to maintain the same window size each time we open the app. I will be showing you the approach that hides the ads; if you do not want to hide them you might have to do some extra works to get it right.
Create window_rescaler.py in util, put
from src.util.screen_getter import get_window_with_title

# Rescale the window to fit the requirement
if __name__ == '__main__':
    chosen_window = get_window_with_title('BlueStacks App Player')
    top, left, bottom, right = 0, -164, 482, 819

    # Calculate the width and height based on the bounds
    width = right - left
    height = bottom - top

    if chosen_window:
        chosen_window.activate()

        chosen_window.moveTo(left, top)
        print(f"Left: {chosen_window.left}, Top: {chosen_window.top}")
        chosen_window.resizeTo(width, height)

        print(f"Window resized to top-left ({left}, {top}) with width {width} and height {height}.")
    else:
        print('Window not found, cannot rescale')
🤓 Here, to get top, left, bottom, right, you will have to use mouse coordinate again.
- top: 0, assuming you have almost perfectly put the emulator window in the top-left corner of the Desktop.
- left: negative [the x-coordinate of the top-left marked dot]. Mine is 164 so I put -164 here.
- bottom: [the y-coordinate of the bottom-right marked dot]. Mine is 482 so I put 482 here.
- right: A tricky one. Use mouse coordinate again, but this time hide the ads. Measure the bottom-right marked dot position. Take the y-coordinate of the measured result. I got 819.
Run the code and you should expect the window moved to the specified location.
📍 Trouble shooting: If the window moved to a wrong location / not moving at all. Try manually dragging it to somewhere else and run the code again until it gets right. I speculate that there are some unknown issues with the pygetwindow’s move / moveTo functions.
⭐ Hint: Check the print result Left: ..., Top: ...; if they don’t match your set values, that means the window has not moved to the expected location.
🎉 Excellent! Now we can get perfect screenshots. Let’s move onto the next step.
Step 3 (Hard-code)
If you only want to gain the highest possible rewards out of the Pachinko machine, read this step and no further!
First, create a new folder hardcode under pachinko. Second, create hardcode.py under hardcode. Inside hardcode.py, put:
import time
import pyautogui
from src.program.program_obj import Program_Obj
from src.pachinko.location.ui_position import drag_from, drag_to
Install the required package:
pip install pyautogui🤓 Pyautogui is a powerful library that can simulate mouse and keyboard interactions.
Next, create a new folder location under pachinko. Then, create ui_position under location. Inside ui_position, put:
drag_from = [609, 445]
drag_to = [609, 480]
🤓 drag_from and drag_to are dragging positions for the handle. Note that this is optimal in my case but might not be in yours. You are encouraged to adjust them until you get desired outcomes.
In hardcode.py, create a new function that can perform drag.
def perform_drag(drag_from, drag_to, speed=0.5):
    start_x, start_y = drag_from[0], drag_from[1]
    end_x, end_y = drag_to[0], drag_to[1]
    duration = speed

    # Move to the starting position
    pyautogui.moveTo(start_x, start_y)

    # Perform the drag
    pyautogui.mouseDown()  # Press the mouse button
    pyautogui.dragTo(end_x, end_y, duration=duration)
    pyautogui.mouseUp()  # Release the mouse button
🤓 Pyautogui will take control of your mouse cursor. On each call, the function will move the mouse cursor to the starting position and perform a press then drag it to the ending position and release the mouse cursor.
Write a main function
if __name__ == '__main__':
    Program_Obj()

    duration = 0.5
    while True:
        perform_drag(drag_from, drag_to, duration)
        time.sleep(0.01)
🤓 We add time.sleep() to prevent the program from high CPU usage.
🎉 That’s actually all we need to get the most optimal rewards in the Pachinko game! Run this program to test it out and adjust the dragging positions as needed.
Step 4 (Collecting data)
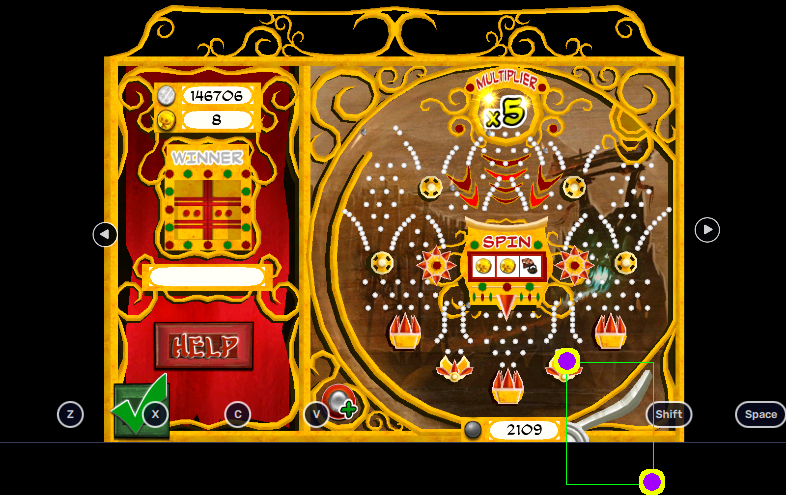
Before we do ML, we should design the data we are going to collect. Recall that we care about the amount of coins and game items we can get. I think the simplest and the most efficient way is to get the coins difference every x seconds. For game items, let’s observe the Winner region:

If we get an item from the Slot machine, the door will open and the item will be displayed with a short amount of time, as shown above. Therefore, we can try to get the proportion of time when the door is open within a time interval (x seconds). That is equivalent to: if we get more items, the door is opened for a longer amount of time.
I think these two pieces of information are enough to solve our problem.
Our current idea is very high-level. That’s why we will start by getting actual data.
Let’s do coins amount extraction first.
I approached this problem in two different ways: with pytesseract library to recognize digits or write a template matching program. Here I am going to introduce the pytesseract approach and I have another post about writing custom template matching program.
Create coins_pytesseract.py under pachinko, put
import re
import pytesseract
from src.util.screen_getter import get_window_with_title, get_screenshot_of_chosen_window
from src.pachinko.location.ui_position import coin_bound
Install the required package
pip install pytesseract🤓 Pytesseract is a powerful text recognition library. I like it a lot but in my experience it only works for 90% of times and it’s significantly slower compared custom template matching. That’s why if your case is specific (like this one), I would highly recommend writing a custom template matching program.
Another thing you need to do is to figure out the coins amount bounds with mouse coordinate. Here is mine, yours could be different.
In ui_position.py, add
coin_bound = (351, 121, 412, 136)If you crop with coin_bound from the game screenshot, you should get something look like this:

👨🔬 This will be your first exercise. Remember, use mouse coordinate to get the positions of top-left and bottom-right marked dots. If you hid the ads, you will have to add the x-coordinates with the width of ads widget. Keep trying until you get it right!
After you have successfully got a screenshot of the coins amount, add this line to coins_pytesseract.py
pytesseract.pytesseract.tesseract_cmd = 'C:\Program Files\Tesseract-OCR\\tesseract.exe'🤓 It’s a necessary component for pytesseract.
Next we want to create a class that takes in a window and read coins amount from it.
In coins_pytesseract.py
class Coins_Pytesseract:
    def __init__(self, window):
        self._window = window

    def extract_coin_amount(self):
        screen = get_screenshot_of_chosen_window(self._window)
        coin_region = screen.crop(coin_bound)
        extracted_text = pytesseract.image_to_string(coin_region, config='--psm 7')

        # Use regular expression to find the integer
        match = re.search(r'\d+', extracted_text)

        # Return the integer if found, otherwise None
        return int(match.group()) if match else None
🤓 The idea is to give to pytesseract and ask it to find all integers in the image. Pytesseract will return str and we use re to find all integers and in the end we convert the match to an integer.
Let’s try with
from PIL import Image

if __name__ == '__main__':
    img = Image.open('test.png')
    extracted_text = pytesseract.image_to_string(img, config='--psm 7')
    match = re.search(r'\d+', extracted_text)
    print(int(match.group()))
and we get result
149756🎉 Now we can read coins amount.
Now moving onto game items. Again, I want you to do the same thing again; this time get the bound for Winner:

Record your winner_bound in ui_position.py. Here is mine, yours could be different.
winner_bound = (338, 213, 405, 273)This idea is so important that it’s worth being mentioned again: we will be creating a while loop that continuously checks whether a given region has changed. In our case, the default region will be:
, anything different will be considered as a change. If we check every 0.1 seconds, then in 5 seconds we would be checking 50 times. If 37 times of them were different, we say there is 37/50 reward_ratio. The higher the better.
This is a template matching problem. In this problem, you will have to own a reference. Therefore, the first thing I want you to do is to store the default door image under pachinko and name it no_winner.png
📍 You should be getting your own default door image.
Next I will show you how to write a class that observes a given bound. It will work for many cases. Create bound_observer.py under pachinko, put
import cv2
import time
import threading
import numpy as np
from src.util.screen_getter import get_screenshot_of_chosen_window
Install the necessary packages
pip install opencv-python
pip install numpy
🤓 cv2 is another powerful image library. It reads images as numpy arrays and manipulates them efficiently. We import numpy here just to later convert PIL image to cv2.
Now we create the class
# Observes a region (bound) in the screenshot
# Outputs a ratio [0,1] of the time when the region
# has changes occurred until reset
class Bound_Observer:
    def __init__(self, window, bound, reference, similarity=0.9, check_exist=False):
        self._change_checks = 0  # within interval
        self._total_checks = 0  # within interval
        self._verbal = False
        self._name = 'default'
Let’s start with the parameters.
window: The emulator window.bound: The bound to be observed, later we will putwinner_bound.reference: This is going to be the reference, later we will put the default door here. This is acv2image.similarity: The threshold of the program recognizing a change. If their similarity is less than this ratio, it will be marked as a change.check_exist: This value essentially toggles the result. In our case, we want to check if a change occurs so we should set it toFalse. As discussed earlier, if we got 37/50reward_ratio; we would be getting 13/50 if this value were setTruebecause it would be checking the time default door exists instead.
Next let’s see our field values:
self._change_checks: This value records the number of times a change occurs, it is the numerator.self._total_checks: This value record the total number of checks, it is the denominator.self._verbal: Controls whether the program should print information, for debugging purposes.self._name: Name of the class instance, for debugging purposes.
I hope now you have a good understanding about this class. Next, inside the constructor of Bound_Observer, add
def check_bound():
    def check():
        screenshot = get_screenshot_of_chosen_window(window)
        if test_change(screenshot):
            self._change_checks += 1
        self._total_checks += 1
        if self._verbal:
            print(f"{self._name}: {self._change_checks} / {self._total_checks}")

    while True:
        check()
        time.sleep(0.1)

self.thread = threading.Thread(target=check_bound)
That thread in the end is the core of this class. I will be telling you where you should use it. Now, let’s analyze the check_bound() function.
First, the program gets the game screenshot. It will be put to test_change and cropped to winner_bound and then compared with our reference. If the check passes, self._change_checks will increment by 1. self._total_checks will increment by 1 regardless of the check. We repeat this step every 0.1 seconds.
Now let’s fill test_change, within the constructor, put
def test_change(screenshot):
    cropped = screenshot.crop(bound)
    result = exists_template_rgb(reference, pil_to_cv2(cropped), similarity)
    if check_exist:
        return result
    else:
        return not result

 def exists_template_rgb(template, screenshot, threshold=0.97):
    # Separate the alpha channel from the template
    bgr_template = template[:, :, :3]

    # Perform template matching
    result = cv2.matchTemplate(screenshot, bgr_template, cv2.TM_CCORR_NORMED)

    # Find the best match location
    _, max_val, _, max_loc = cv2.minMaxLoc(result)
    return max_val > threshold

def pil_to_cv2(image):
    if image is None:
        raise ValueError("Input image is None. Ensure the image source is valid.")

    # Assuming `image` is a PIL Image (e.g., result of screen.crop())
    # Convert PIL image to a NumPy array
    image_np = np.array(image)

    if image_np.size == 0:
        raise ValueError("Input NumPy array is empty after conversion from PIL image.")

    # Check the number of dimensions to determine if color conversion is needed
    if image_np.ndim == 3:  # Color image (RGB)
        # Convert RGB to BGR
        image_bgr = cv2.cvtColor(image_np, cv2.COLOR_RGB2BGR)
    else:
        # Grayscale or other single-channel image, no conversion needed
        image_bgr = image_np
    return image_bgr
You do not need to know everything going on here. But if you want to, I have annotated the code for you.
🎉 That was all for the constructor. Now we still need to add some functions for this class.
Add these functions in Bound_Observer
def get_ratio(self):
    return self._change_checks / min(self._total_checks, 1)

def reset(self):
    self._change_checks = 0
    self._total_checks = 0

def set_verbose(self, name='default'):
    self._name = name
self._verbal = Trueget_ratio: This is the actual function you get result fromBound_Observerreset: Resets the valuesset_verbose: Toggle on to debug. Could be helpful when you encounter bugs.
🎉 Great! Now our program has the ability observe the door.
Step 5
So far we can get coins amount and reward_ratio for game items from game screenshots. Sounds no much but it’s already a lot of work.
The next step will be building a game simulator. This time I will give you some visual aids.
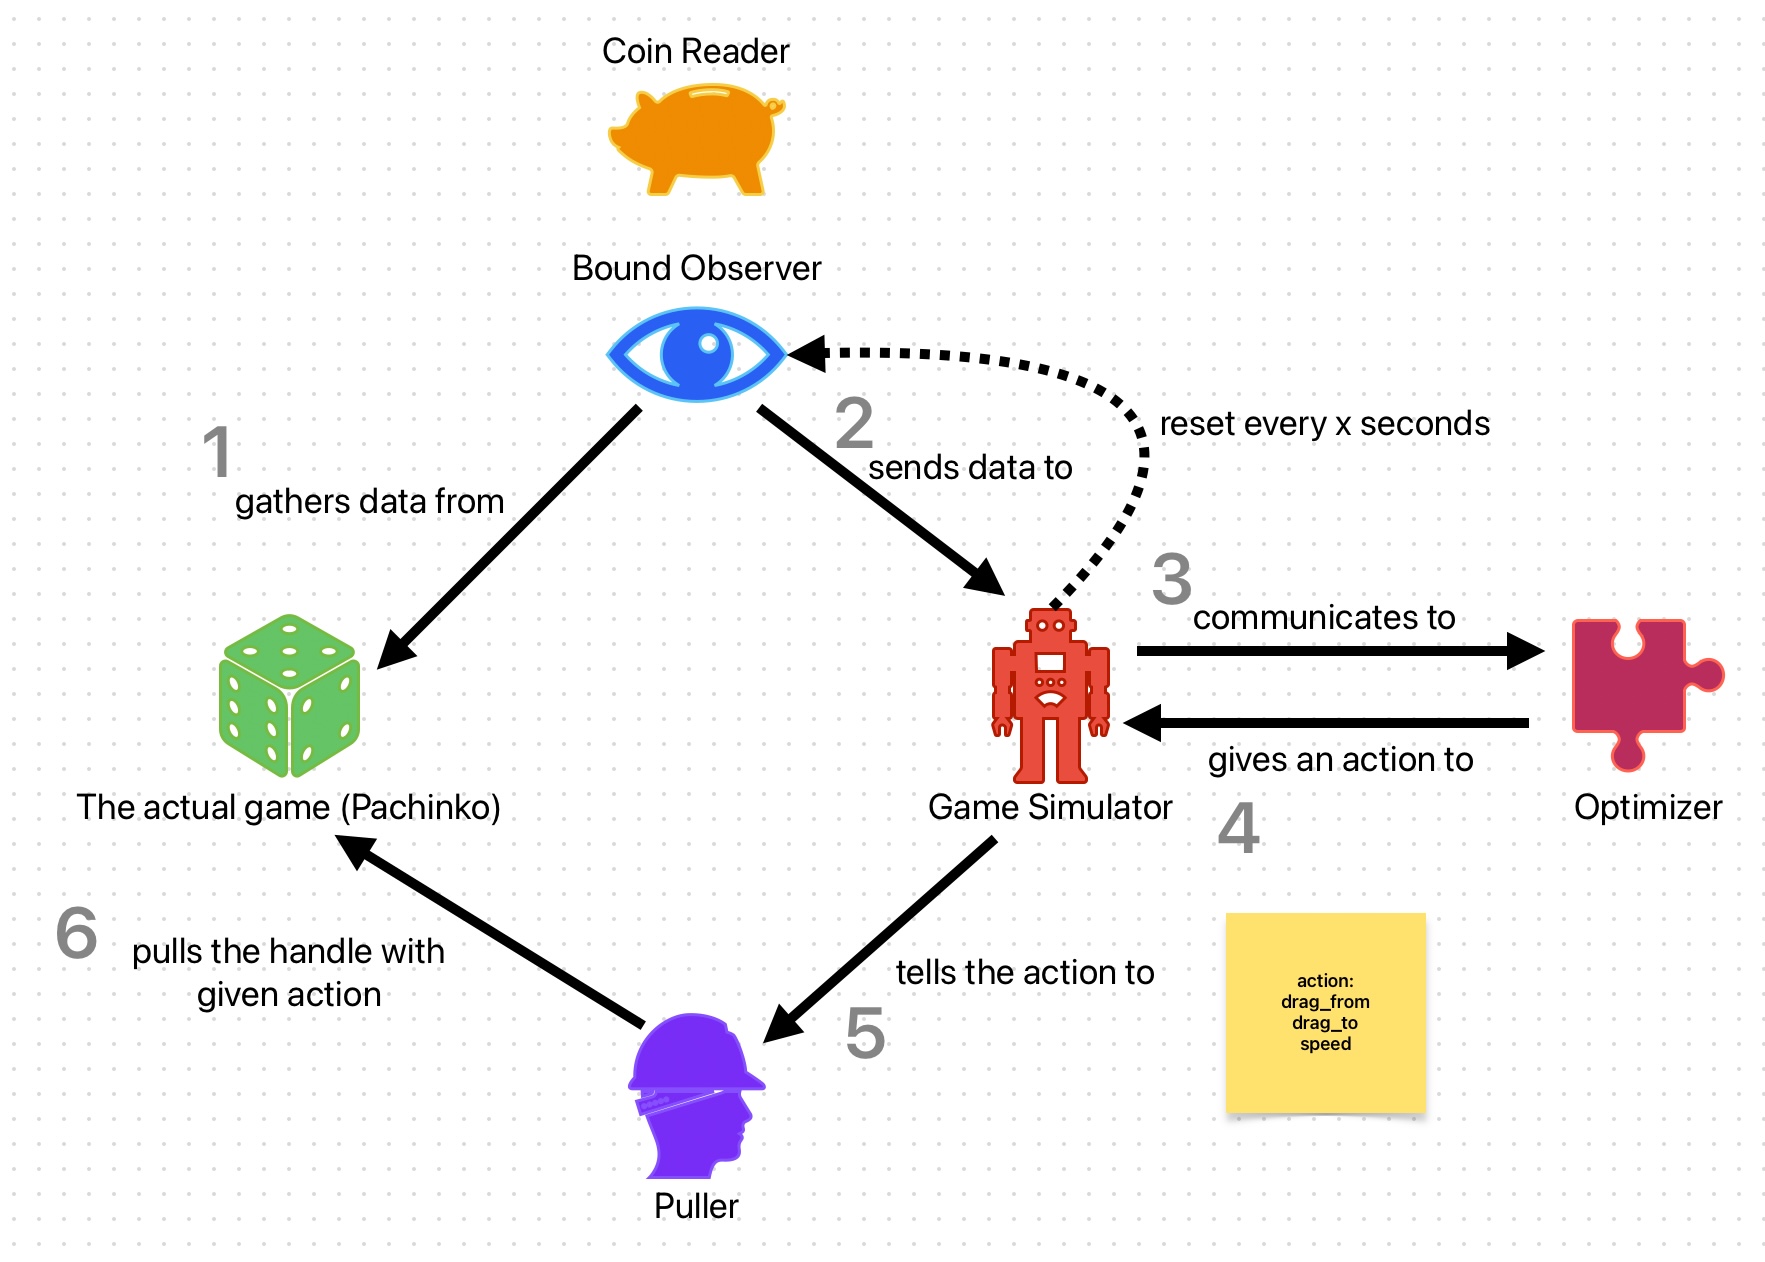 Currently we have done phase 1 and phase 6 (sort of) in the diagram. Based on this diagram, we see that the game simulator has relations to many components. Don’t worry, you just need to know one single most important thing about the game simulator - it produces a score in the end of each interval!
Now we will refine the puller a little bit by giving it its own script.
Create puller.py under pachinko, put
import pyautogui


class Puller:
    @staticmethod
    def perform_pull(drag_from, drag_to, speed=0.5):
        start_x, start_y = drag_from[0], drag_from[1]
        end_x, end_y = drag_to[0], drag_to[1]
        duration = speed

        # Move to the starting position
        pyautogui.moveTo(start_x, start_y)

        # Perform the drag
        pyautogui.mouseDown()  # Press the mouse button
        pyautogui.dragTo(end_x, end_y, duration=duration)
        pyautogui.mouseUp()  # Release the mouse button
done!
Now create game_simulator.py under pachinko, put
import time
from src.pachinko.puller import Puller
from src.pachinko.coins_pytesseract import Coins_Pytesseract


class Game_Simulator:
    def __init__(self, window, winner_observer, interval=10):
        self._interval = interval
        self._start_time = time.time()
        self._puller = Puller()
        self._coin_reader = Coins_Pytesseract(window)
        self._curr_coins = self._get_coins()
        self._winner_observer = winner_observer
Again, we start analyzing from the parameters.
window: The emulator window.winner_observer: Reference to winner observer (Bound_Observer).interval: (Seconds) Produces a score every x seconds.
The fields.
self._interval: See above.self._start_time: Used to track time for interval.self._puller: Reference to a puller.self._coin_reader: For reading number of coins.self._curr_coins: Used to track the current number of coins.self._winner_observer: For getting reward ratio.
Let’s write our first function in this class.
def reset(self):
    self._start_time = time.time()
    self._curr_coins = self._get_coins()
    print(f"Reset current coins: {self._curr_coins}")
    self._winner_observer.reset()
🤓 The reset function is called on each episode starts.
Our next function is the core of this class.
def play(self, action):
    drag_from = [action[0], action[1]]
    drag_to = [action[2], action[3]]
    speed = action[4]
    self._puller.perform_pull(drag_from, drag_to, speed)

    if self._time_elapsed() >= self._interval:
        self._start_time = time.time()
        curr_coins = self._get_coins()
        score = self._calculate_score(curr_coins)
        return score, True

    return 0, False
🤓 It has one parameter action, which is a list of five numbers. The first two elements are drag_from, the next two are drag_to, and the last one is speed. We will let the puller pull using these three values instead of our preset values (from Step 3). The next if statement is just checking if the time is up: if yes, calculate a new score, otherwise return 0.
It is easy to get the elapsed time.
def _time_elapsed(self):
    return time.time() - self._start_time
Getting the coins amount is also quite easy now, but we need to handle when the function fails to get a result.
def _get_coins(self):
    result = self._coin_reader.extract_coin_amount()
    if not result:
        result = 0
    return result
The last function in this class.
# We have two things to consider:
# 1. the winner ratio within interval
# 2. the score increment within interval
# Here is just a random formula to calculate the score
def _calculate_score(self, curr_coins):
    increased = curr_coins - self._curr_coins
    print(f"Increased coins: {increased}")
    result = max(increased + 20 * self._winner_observer.get_ratio(), 0)
    if result == 0:
        return -5  # Test negative rewards
    return math.log(min(result, 5000))
Here I came up with a random formula for calculating the score. My formula:
\(f(x) =
\begin{cases}
-5 & \text{if } x = 0, \\
z & \text{otherwise}.
\end{cases}\)
\(x = \max \left( \text{increased} + 20 \cdot \text{ratio}, 0 \right)\)
\(z =
\log \left( \min \left( x, 5000 \right) \right)\)
👨🔬 To-do Task: after you have completed the entire tutorial, remember to experiment with new formulas. Share your formulas at my github issues if you do like!
🎉 Wonderful, now we have a game simulator.
Step 6
This is the final step that is going to wrap up everything together and this is also where we are going to introduce our main role: scikit-optimize.
Create main.py under pachinko, put
import cv2
import threading
import numpy as np
from skopt import Optimizer
from src.program.program_obj import Program_Obj
from src.util.screen_getter import get_window_with_title
from src.pachinko.game_simulator import Game_Simulator
from src.pachinko.bound_observer import Bound_Observer
from src.pachinko.location.ui_position import winner_bound
from src.pachinko.location.ui_position import (drag_from_x_max,
                                               drag_from_y_max,
                                               drag_to_x_max,
                                               drag_to_y_max,
                                               drag_from_x_min,
                                               drag_to_x_min,
                                               drag_from_y_min,
                                               drag_to_y_min)
Install the required packages
pip install scikit-optimizeWe have imported a lot things this time, but you already know most of them. skopt is short for scikit-optimize, we will be using an optimizer called “Gaussian Process”. It is a form of lazy learning. The goal of GP is to predict the best input to maximize the reward.
If we think about this, the only thing we care about can be interpreted to a score which we have a way to measure. To pull the handle, we only need (drag_from, drag_to, speed), which is equivalent to a list of numbers. If we try different combinations, we get different scores, and we attempt to find the best one among them. GP will somewhat make this process faster.
You probably also have notice that we have imported 8 new values from ui_position, go to the script and add
drag_from_x_max = 648
drag_from_x_min = 569
drag_from_y_max = 452
drag_from_y_min = 413
drag_to_x_max = 648
drag_to_x_min = 569
drag_to_y_max = 491
drag_to_y_min = 452
📍 These values works in my case. You are very likely have to find your own.
To find these values, use mouse coordinate and find positions for these two marked dots. The bottom-right dot is outside the window.
After you have found them, do some math to find the middle two.
upper_left_dot = [569, 413]  # Put your own here
bottom_right_dot = [648, 491]  # Put your own here
drag_from_x_max = bottom_right_dot[0]
drag_from_x_min = upper_left_dot[0]
drag_from_y_max = (bottom_right_dot[1] + upper_left_dot[1]) / 2
drag_from_y_min = upper_left_dot[1]
drag_to_x_max = bottom_right_dot[0]
drag_to_x_min = upper_left_dot[0]
drag_to_y_max = bottom_right_dot[1]
drag_to_y_min = (bottom_right_dot[1] + upper_left_dot[1]) / 2
🤓 The green region painted above will be the “drag_from” region. The red region painted above will be the “drag_to” region.
Next we are going to write our last function and it’s going to be very long so I will break it into parts. The first part is initializations.
def main():
    chosen_window = get_window_with_title('BlueStacks App Player')

    bounds = [(drag_from_x_min, drag_from_x_max),
              (drag_from_y_min, drag_from_y_max),
              (drag_to_x_min, drag_to_x_max),
              (drag_to_y_min, drag_to_y_max),
              (0, 0.5)]
    # Initialize the Bayesian optimizer
    optimizer = Optimizer(bounds, base_estimator="gp", random_state=37, n_initial_points=10)

    # The reference for template matching
    winner_ref = cv2.imread('no_winner.png', cv2.IMREAD_UNCHANGED)
    winner_observer = Bound_Observer(chosen_window, winner_bound, winner_ref, similarity=0.9)
    sim = Game_Simulator(chosen_window, winner_observer, interval=10)

    episodes = 100
    exploration_noise = 0.1
    noise_factor = [10, 10, 10, 10, 0.1]
chosen_window is already old news. bounds is a necessary parameter for optimizer. Here, we are telling the optimizer to generate a list of five numbers, given by the ranges. I have already explained drag_from and drag_to. The last one is for speed. It’s saying that randomly choose a duration from 0 seconds to 0.5 seconds. Lower this value, the faster it pulls. You are welcome to adjust these values to see if things can go better.
Next we have the optimizer. We are using Gaussian Process (GP), and it’s written as “gp” here. The random_state can be any integer. The n_initial_points is just telling the optimizer the randomly initialize n samples when it is initialized.
winner_ref is a cv2 image. We discussed this earlier when we were making Bound_Observer. This would be the reference for our winner_observer. The cv2.IMREAD_UNCHANGED flag means that reading the image as it is. Preserving all channels and every pixel is same as the original.
sim, the game simulator, and we are using an interval of 10 seconds. You can change this to other values.
The last three values are hyper-parameters. You can freely change them. Here, one episode is equivalent to elapsing 10 seconds. So 100 episodes is the same as the program will be spending around 1000 seconds to run. The exploration_noise and noise_factor slightly alter the next actions. They add more randomness to the program. You can disable it by setting
exploration_noise to 0.
Now let’s actually do some machine learning. Within main(), put
def lazy_learn():
    reward_history = []
    for e in range(episodes):
        sim.reset()
        total_reward = 0
        episode_actions = []

        for _ in range(500):
            next_action = optimizer.ask()
            next_action = [x + exploration_noise * np.random.uniform(-noise_factor[i], noise_factor[i])
                            for i, x in enumerate(next_action)]
            next_action = [np.clip(v, low, high) for v, (low, high) in zip(next_action, bounds)]

            episode_actions.append(next_action)
            reward, done = sim.play(next_action)

            if reward != 0:
                reward_history.append(reward)
                # Standard score
                reward = (reward - np.mean(reward_history)) / (np.std(reward_history) + 1e-8)
                # print(f"Next action: {next_action}, reward: {reward}")

            total_reward += reward
            if done:
                break

        optimizer.tell(episode_actions[-1], total_reward)
        print(f"Episode {e + 1}: Total Reward = {total_reward}")

    best_action = optimizer.Xi[np.argmax(optimizer.yi)]
    print("Best Action:", best_action)
    print("Best Reward:", max(optimizer.yi))
We create reward_history to store all non-zero rewards we have encountered so far. Recall that if a score is not ready if it is 0. Next we have a gigantic for loop but it is just essentially exploring different possible combinations so that the optimizer will return a good action (drag_from, drag_to, speed) in the end.
But it is also worth to understand what the loop is actually doing here. In each episode, we want to start by resetting the simulator so that it is the same as before. No residue stuff that affects judgements. total_reward stores the total rewards for the current episode. episode_actions stores all actions in the current episode.
In the inner loop, we want it to run until the score (reward) is ready. The first thing we do is to ask the optimizer what’s our next_action. After that we apply noises on next_action, this step is not required. Then we make sure our action is within bounds, otherwise optimizer will complain when it encounters one. Now we are satisfied with next_action, save it to episode_actions.
Now, after all the hard works, we can tell the simulator to play the action. If it returns a non-zero reward, done will be True. We append non-zero rewards to reward_history. However, we then standardize reward before telling it to the optimizer. This is because we don’t want old standardizations to affect new standardizations. After that, add reward to total_reward. Actually, you should be expecting total_reward to add a bunch of zeros before adding a non-zero value. In the end, break from the loop when done is true.
We tell the optimizer about the last action the simulator performed in the episode along with the standardized reward. It will automatically figure out the next best predicted action.
optimizer.Xi[np.argmax(optimizer.yi)] is really just saying finding the best input (the best action) given by the best output (the highest reward) that optimizer has.
Next we start the threads and get the thing run. Still within main(), put
learn_thread = threading.Thread(target=lazy_learn)
learn_thread.start()
winner_observer.thread.start()
learn_thread.join()
winner_observer.thread.join()
🤓 Program has started learning and the winner_observer has started observing.
The only last thing we need to add is amazingly simple.
if __name__ == '__main__':
    Program_Obj()
    main()
Remember, you would have to go through all episodes to see the final result.
FYI, this is what I got after 100 episodes.
drag_from = 576.0650605485463, 445.66566461020403
drag_to = 612.9658921893482, 490.7634947666629
speed = 0.47014037277376075
It consistently hits the balls into Slot machine, but unfortunately the ball is not hitting the middle trap. I guess it could work after more episodes.
🎉 Well, it was a very detailed (and long) tutorial. I hope you like this. If you have any doubts, you can send an issue ticket and I might offer helps.
🍯 Happy Coding 🍯
This article, completely original, is copyrighted by its author, me. Please do not reproduce it.
本文为原创作品,作者 Kolyn090 拥有其著作权,受法律保护。严禁复制、转载、仿冒或以任何形式使用。